
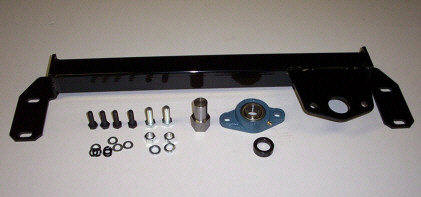
Complete stabilizer kit. (Patent Pending) ’94 to ’02 4wd model shown.
This product will greatly reduce steering “wander” on your late model Dodge pickup. This unit will serve to eliminate sector shaft play in the steering box which is a large contributor to wandering and poor road feel. It also serves to minimize frame flex at the steering box mounting point.
Features:
Made in Canada.
Straight bolt-on installation. No drilling or welding.
All mounting hardware is supplied.
Durable powder-coated finish.
NTN® bearing is easily replaced if necessary and is available at industrial or agricultural supply firms.
Installation instructions for steering box brace

Remove original pitman shaft nut from steering box and retain lockwasher.
Install new pittman shaft nut using original washer and torque to 185 ft/lbs.
Arrange a jackstand or other means of support for stabilizer bar. Make sure stabilizer bar is supported – it will drop!

Now remove 4 stabilizer bar mounting bolts and lower bar 3 or 4 inches. Stabilizer bar links may need to be loosened under certain conditions to allow enough movement.
On 4×4 models, slide bracket in from front, positioning outer mounting tabs over stabilizer bar mounts, and bearing mounting plate under stabilizer bar. On 2WD models, slide bracket in from rear over stabilizer bar mounts.

Position large hole in bracket over steering box shaft extension nut and lift bracket and stabilizer bar into place. There will be very limited clearance between bracket and stabilizer bar until everything is in place and bolts are tightened.
Use 4 new M10 x 35 bolts, lock and flat washers, to attach bracket and stabilizer bar to original stabilizer bar mounting holes. Do not tighten yet. Keep in mind that stabilizer bar will need to be pushed rearward to line up mounting holes as it has a tendency to move forward when unbolted.
Snug mounting bolts up, but allow for final positioning of bracket.

Align bracket by centering steering shaft nut in large hole in mounting plate. This does not need to be perfect as there is some allowance in bearing holder.

Tighten 4 mounting bolts to 40 ft/lbs and check to make sure bracket positionis maintained with respect to steering shaft nut.
We recommend use of an anti-seize compound in bearing bore and lock ring. Grease is also suitable to allow for future disassembly.
Install bearing holder and bearing (comes assembled) onto steering shaft nut . Orient grease nipple in desired position.


IMPORTANT: Do not worry if bearing housing does not sit flat against mounting plate as it is a self aligning unit and will align as bolts are tightened.
Attach bearing with two 1/2 x 1 1/2″ bolts, lock washers and nuts. Torque to 50 ft/lbs.
***IMPORTANT***: Tightening these two bolts after the four frame mount bolts are torqued will ensure that no unwanted preload is applied to the steering box.

Install bearing lock ring by sliding onto shaft and rotating ring to allow it to engage eccentric on bearing race. Rotate lock-ring tight by tapping with punch and hammer in hole in lock ring. Do not pound on setscrew hole! Lock ring will lock in either direction. Tighten set screw with 1/8 ” Allen wrench.
Grease bearing at normal chassis lube intervals.
Notes:
Do not use this bracket as an attachment point for towing or winching!
In the event that bearing needs to be replaced and refuses to slide off after removing lock ring and mounting bolts, you may remove steering shaft nut by inserting a flat wrench between bracket and steering box and unscrewing shaft and bearing as a unit. This will allow you to press bearing off shaft. Remove bearing from holder by twisting bearing 90 degrees to holder in alignment with two slots in backside of holder.
Bearing is an SA 205-16 ( or 205-100 ) one inch bore self-aligning unit. Be sure to specify metal shields and a grease hole. Holder is a standard two-bolt flange FL 205.

[thanks to Windecker Machine, solidsteel.ca, used with permission]
