

Work Performed on an ’03 CTD
The ujoint pictured below is the factory joint that I just took out. My rear drive shaft was replaced the 1st time to the dealer under warranty. Then they replaced the ujoints again after that, making a total of 3 sets of factory joints within 75,000. When I first started feeling the shudder again, I tried to hold off by using a needle point and injecting grease under the seal. I bought 2 months that way, but I’m not putting the miles on my truck right now that I used to. Anyway, I finally broke down and started the task with three #351’s in hand.
I’m still convinced that sticky joints cause way more shudders/vibrations than driveshaft alignment. There is just no possible way for a 2-piece driveshaft to lay in a rubber damper/carrier and stay balanced with sticky joints.

So, with all of the "351’s fit perfectly" to the "had to grind the yoke" to had to "grind the end of the cap"
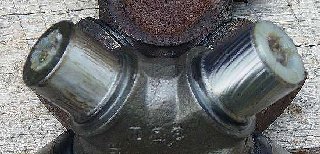
The first thing I notice was that the joint wouldn’t fit the yoke. This didn’t happen on every yoke, especially the slip yoke at the transfer, there was plenty of clearance there; that’s the end of a sharpie attempting to point out the interference
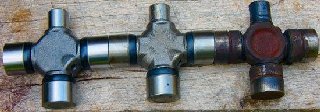
The joint body or trunion is thicker and overall more hefty; #351 is in the center, I’ll get to where the 230-0188 on the left came into play

So with the heavier center in the aftermarket joints, here is where the interference starts — yes, within the blurr, thats a scriber point showing the heavier body of the joint resting inside the yoke causing clearance problems

The only thing that was needed was to break the edge of the bore and lay it back for the heftier joint to slip right in. I used a carbide burr and die grinder, a dremel would work too.

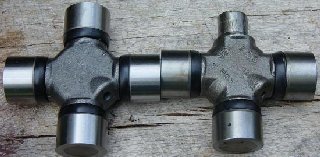
The next thing I noticed was that the bearing surface on the cap of the aftermarket joints is about 3/16" longer than the factory joint. I didn’t really think it would be a problem.
Well, for me it caused a problem. The caps don’t sit as deep before actually pressing, or hammering in my case. If I still had my machine shop I could have pressed them. Either way, 4 hands have been better in this situation, because the shorter bearing surface on the factory joint captures the needles sooner. We all know what happens when you get needles under the ujoint inside the cap! You have to hammer/press the cap back out the way it came in. And beyond possibly breaking a needle, the 351 has a plastic end bearing. You can see here what happens to that plastic bearing surface after hammering it back out with needles under it.
This is how I got my hands on a 230-0188. After carrying the 351’s around with me for over a month, and then ruining one, NAPA changed the playing field. They no longer list a Precision #351, now it’s a NAPA #230-0188.They assured me it was the same joint, and while all three have a 1.375" cap diameter and 4.200" OAL cap end to cap end ……….. there have already proven to be subtle differences. As you can see on the left, the 230-0188 seems even heftier. The 351 on the right is the one I wasted, the cap is somewhere over the hill in the woods
So, back at it I went without a single ujoint installed yet. After telling myself to be very careful to hold the joint up in the cap with one hand, while hammering the cap down with my other hand — it occured to me. How would I ever get one of these joints out after getting it in. Not that I expect these greasable joints to sieze up as quick as the factory joints, but hey!
On disassembly, once you hammer/press one cap as deep as you can go, before the body/trunion hits the other side of the yoke, there is still at LEAST 3/16" of bearing surface engaged! Even some of the factory caps needed twisted out with a pair of 18" channel locks/water pump pliers.

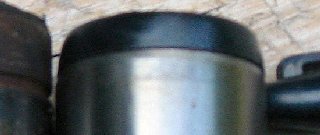
So, I decided to spin a couple thousandth off of the OD with my belt sander about 3/16" back. This is probably not necessary and hard to see in the pic, but it helped with assembly and will no doubt help with disassemly.
The factory joint has about .015" difference in Dia., and also a snap ring groove apparently for another application, but I was cool with just a couple thousandth — we are only talking a thousandth or 2 press. If you scroll up to the other cap pic, the relief I ground on the OD is more apparent.
Okay, after what I consider a long, trying afternoon, I’ll call it a success.
The one thing I did read in another post, but didn’t get a picture of, was the keepers or snap rings. In another thread, I read where somebody had to grind the ends of the caps to get the snap rings in. I admit that the joint was a little stiff before greasing and the snap rings looked a little hooved up.
This preloads the joint from end to end, and I noticed it more on the 351 with the plastic ends than the 230-0188 with metal ends. I also noticed the same thing on the factory joints. I think grinding the ends of the caps to make to snap rings easier to install is gonna lead to trouble. With no preload, and especially plenty of clearance, your prolly gonna set yourself up for a joint walking back and forth. Once the joint is in, just tap it back forth until the rings look evenly stressed and call it done!
I’m not an automotive specialist, and these are only my findings which may or may not be helpful to you guys. I haven’t changed a ujoint in years, and back when I did, it was a 1 piece with one end strapped into the pinion yoke, the ujoint was a direct replacement and the driveshaft didn’t weigh 300#
[thanks to JHARDWICK used with permission]