Symptom/Condition: The vehicle may not warm completely, especially in cold ambient temperatures. This condition may be due to a thermostat that is stuck in the partial open position by debris in the cooling system.
NOTE: THE COOLING SYSTEM USED ON THE CUMMINS DIESEL ENGINE EQUIPPED VEHICLES PROVIDES THE CAPACITY AND PROTECTION OF THE HIGHER GVWR AND GCWR RATINGS AVAILABLE ON THESE VEHICLES. OWNERS SHOULD BE ADVISED OF THE NORMAL SLOWER WARM UP AND LOWER ENGINE OPERATING TEMPERATURES ASSOCIATED WITH DIESEL ENGINES.
THE COOLANT TEMPERATURE GAUGE WILL FLUCTUATE ON DIESEL ENGINE EQUIPPED VEHICLES. IT IS INFLUENCED BY VEHICLE LOAD, OUTSIDE AMBIENT TEMPERATURE AND EXTENDED IDLE TIME. THIS FUNCTION IS CONSIDERED NORMAL
GAUGE FLUCTUATION WILL BE NOTICED MOST OFTEN UNDER STEADY STATE (HIGHWAY) DRIVING USING THIS THERMOSTAT (P/N 4796869). PLEASE ENSURE THAT YOUR CUSTOMER IS AWARE OF THIS NOTE PRIOR TO RELEASING THE VEHICLE.
Parts Required:
| Qty. | Part No. | Description |
| 1 | 4796869 | Thermostat, 5.9L Diesel |
| 1 | 4761292 | Seal, Inner |
| 1 | 4761291 | Seal, Outer |
Repair Procedure:
This bulletin involves the replacement of the engine thermostat.
WARNING: DO NOT LOOSEN THE RADIATOR CAP OR DRAIN COCK WITH THE SYSTEM HOT AND PRESSURIZED. SERIOUS BURNS FROM THE COOLANT COULD RESULT.
NOTE: DO NOT WASTE REUSABLE COOLANT. STRAIN THE COOLANT INTO A CLEAN CONTAINER FOR REUSE.
1. Disconnect the negative cables from both batteries.
2. Remove the accessory drive belt.
3. Drain cooling system until the coolant level is below the thermostat.
NOTE: CONSTANT TENSION HOSE CLAMPS ARE USED ON MOST COOLING SYSTEM HOSES. WHEN REMOVING OR INSTALLING, USE ONLY TOOLS DESIGNED FOR SERVICING THIS TYPE OF CLAMP (SPECIAL TOOL NUMBER 6094 OR. SNAP-ON CLAMP TOOL NUMBER HPC-20). ALWAYS WEAR SAFETY GLASSES WHEN SERVICING CONSTANT TENSION CLAMPS. A NUMBER OR LETTER IS STAMPED INTO THE TONGUE OF CONSTANT TENSION CLAMPS. IF REPLACEMENT IS NECESSARY, USE ONLY AN ORIGINAL EQUIPMENT CLAMP WITH A MATCHING NUMBER OR LETTER.

4. Remove the radiator hose clamp and hose from the thermostat housing. A special clamp tool must be used to remove and install the constant tension clamps.
5. Remove the hose clamp and check valve hose at the thermostat housing.
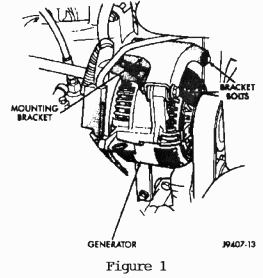
6. Remove the two upper generator bracket mounting bolts (Refer to Figure 1).
7. Loosen but do not remove the generator lower pivot bolt.
8. Position the generator to gain access to the thermostat housing and the housing bolts.
9. Remove the thermostat housing mounting bolts.

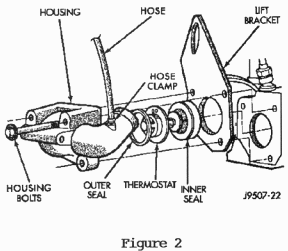
10. Remove the thermostat housing, thermostat, inner and outer seals and lift bracket (Refer to Figure 2).
11. Clean the mating surfaces of the thermostat housing and the cylinder head.
NOTE: THE THERMOSTAT SHOULD BE INSPECTED FOR DEBRIS. IF THE THERMOSTAT IS DETERMINED TO HAVE DEBRIS IN IT, THEN DRAINING, FLUSHING, AND FILLING OF THE COOLING SYSTEM IS REQUIRED.
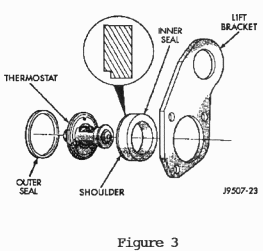
12. Install a new outer seal into the machined shoulder on the thermostat housing (Refer to Figures 2 and 3).

13. Install new thermostat into the machined shoulder next to the outer seal. Note the direction of the thermostat from Figures 2 and 3.
14. Position the inner thermostat seal with the shoulder towards the thermostat housing.
15. Install the thermostat, lift bracket, seals and housing to the engine as an assembly. Install and tighten the mounting bolts to 24 Nm (18 ft. lbs.), torquing the short bolt first and then the two longer bolts.
16. Position the generator to the thermostat housing. Install and tighten mounting bolts to 24 Mm (18 ft. lbs.). Tighten the pivot bolt to 43 NM (32 ft. lbs.).
17. Install the check valve hose and hose clamp at the thermostat housing.
18. Install the upper radiator hose and claws to the thermostat housing and to the radiator.
19. Install the accessory drive belt.
20. Connect negative battery cables to both batteries.
21. Fill the cooling system and check for leaks.

