1. A hole must be drilled and tapped into the intake crossover pipe for a boost source.
2. Remove the hose from the intake crossover pipe and push a rag well into the pipe past the point to be drilled and tapped. This will prevent chips from entering the engine.
3. Drill through the back side of the crossover pipe using a letter “R” (.399 dia) drill bit just above the turbo compressor hose joint.
4. Tap this hole with a 1/8 NPT pipe tap to accept the fitting.
5. Use grease on the drill and tap to allow a minimum of chips to fall into the crossover pipe.
6. MAKE SURE TO REMOVE THE RAG from the crossover pipe and clean out any chips.
7. Install fitting and connect hose making sure hose fits snug but does not pinch.
Boost Gauge Installation Dodge Cummins Turbo Diesel 1991-1998 12 Valve (Intercooled)

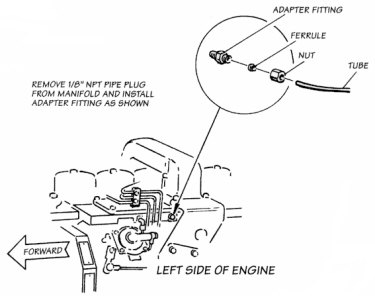
1. Locate and remove the 1/8″ NPT pipe plug (see pic) on the driver’s side of the intake manifold.
2. Install the fitting and connect the hose making sure that the hose fits snug but does not pinch.
Boost Gauge Installation on the 24 valve Engine 1998-2002
The easiest way to install a boost gauge on a 24V Dodge is to first aquire a 3/4″ NPT to 1/8″ NPT reducer fitting. next locate the 3/4″ NPT pipe plug in the intake manifold. The best one of these to use is located on the back of the engine between the fuel filter and the firewall. The 3/4″ NPT plug has a 1/2″ square in the center of it and can be removed easily with a 1/2″ drive ratchet and extention. Replace the 3/4″ NPT factory plug with the reducer plug and the fittings that come with the boost gauge tubing kit will now fit and allow the tubing to be ran from the intake manifold to the boost gauge.
[thanks to DIS dieselpage.com used with permission]
