
Water Injection : Injecting water into the intake , Decreases the volume of each cylinder Sends the Pistons into Over Drive , add some alcohol to up the flash point of diesel and to be sure it all burns up and burns up fast and you have the complete package.
Cooling Mist (www.coolingmist.com)
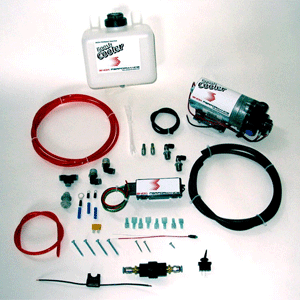
Our Diesel kits come with the hardware to make sure you get the waterflow you need. Included in these kits are 6 different nozzles and our water/alcohol tee. With this you can run dual nozzles or single nozzles. Eitherway you will have extra nozzles for tuning. Nozzles included will range from 6 gallons per hour to 18 GPH. These are complete kits with tanks, leds, arm/disarms switches and high quality brass water/alcohol filters. Please read the details above to see whats included in your kit. The stage I kit does not come with a tank, but the stage 4 comes with a 6 gallon tank Please NOTE: All of the fittings in this kit are made of brass. No cheap plastic fittings. Also, our kits are designed to be super clean. No clamps are needed for your hose lines.
These diesel packages are the best value on the net. No plastic fittings. All high quality brass. These all include a high pressure 150 psi pump, solenoid, brass water filter and 6 nozzles that allow you to run it as a single or dual nozzle setup, water tank taping kit, arm disarm switch, led, Each of these packages have a different size tank from no tank to 6 gallons.
Snow Performance (www.snowperformance.net)
For applications over 350 HP/25 psig boost. Features include a high volume, high pressure pump and new Heavy Duty Digital Variable Controller (25-100psi) for max power and cooler EGT’s. Great for smooth power at all boost/RPM levels. Expect 70RWHP and 250°f exhaust gas temp. reductions.
Why Water/Methanol Injection?
The Boost Cooler® is Snow Performance’s latest generation water/methanol injection system. The primary function of water/methanol injection is to provide “chemical intercooling”.
In gasoline engines, as with any intercooler, this suppresses detonation so more power producing boost and timing can be utilized. Water, with its high latent heat of vaporization cools the intake charge and combustion. Methanol cools the charge and combustion but also acts like an extremely high octane fuel (some researchers claim as high as 120 octane) as well as adding more oxygen to combustion.
In diesels, the effect is three fold: 1. The intercooling effect provides for more available air and all the benefits of a higher positive pressure ratio (more power giving fuel can be utilized safely without high combustion temperatures). 2. The combustion of water provides for more power on the power stroke. 3. Methanol acts as an additional fuel for more power.
A brief History:
Water injection was evaluated scientifically in the 1930’s by H. Ricardo who demonstrated that one can basically double the power output of an engine using water/methanol. The first widespread use was during WWII on supercharged and turbocharged aircraft. In 1942, the German Luftwaffe increased the horsepower of the Focke-Wulf 190D-9 fighter aircraft from 1776HP to 2240HP using 50/50% water/methanol injection. The allies soon followed by fitting the P51 Mustang and other high performance aircraft with water/methanol injection. Following the war, the turboprop aircraft industry used water/methanol injection and called it the “automatic power reserve system (APR)” for use in hot or high altitude take off. It surfaced again in the 60’s when GM used a system on the OEM turbo Corvair. It was used effectively in Formula 1 before being banned for adding too much power.
The latest competitive use is in World Rally Racing (WRC) where virtually all teams use it in some form and in diesel truck/tractor pulling competition. It is important to note that in the fall of 2004, the long standing world record in the quarter mile for diesels was broken twice (now 7.98 sec) by two different vehicles; both using the Boost Cooler$reg; water/methanol injection system by Snow Performance.
DIY !
Basic outline of what needs to be done
From www.enginerunup.com
1.The Water Tank:
Most people use the car’s washer fluid tank.Regardless of which tank you use, make sure it is around 1 gallon or larger.Since everyone will have a different tank setup, hardware is not included to attach the tubing to the water tank.
Take the 3/8″ tubing (the one that is thicker and more flexible) and run it from the water tank to where you plan on mounting the water pump. Since this is on the vacuum side of the pump, no clamps are needed.
2.Water Filter:
If you are using a water filter, it should be installed between the water pump and the water tank.Since this is installed on the vacuum side, no clamps are needed.If you look at the filter, there is an arrow for the direction of flow, so be sure to mount accordingly.
3.The Water Pump:
There is a black and a red wire off the pump for ground and positive.Mount the pump in a secure location as close to the tank as possible for simplicity.The pump can be mounted with (4) sheet metal screws, or zip ties, just be sure the pump is secure.Common places for the pump to be mounted are in the engine compartment, near or opposite the washer injector bottle, or in the trunk.Note that the trunk installation will require more wiring and tubing.There are three fittings for the water pump:
1-3/8″ NPT x 3/8"e Barb – Nylon
1-3/8″ NPT x 3/8" Barb with a 90° bend – Nylon
1-3/8″ NPT x 1/4" Barb – Brass Clampless Fitting
Only one of the 3/8″ NPT x 3/8″ barb is needed, but I include one with a 90° to allow for some flexibility when mounting the pump in tight spaces, or you can use it to tap your water tank.
Wrap Teflon tape around the fittings for about 3 wraps, and then screw them into the pump.The fitting with the 3/8" barb goes on the ‘in’ side and with the tubing going to the water tank.The Brass Clampless fitting 1/4" barb which goes on the ‘out’ side and eventually goes to the injectors.The water pump is preset to 100 psi, or 150 psi, depending on which kit you purchased.There is an allen screw on the pump that allows for adjustments.This way you can adjust the amount of water injected by simply unscrewing for less pressure, and screwing in for more pressure.
High Pressure Tubing:
The High Pressure Tubing will be run from the water pump, all the way to the injectors.Figure out where you plan on running the tubing, and then you can visualize where the solenoid(s) will be mounted, as well as the pressure detector if you have a level 2 kit.The high pressure tubing will run from the $reg;Out’ on the water pump, to the Water Solenoid (If you have a dual stage, then from the pump to the $reg;Tee’, then to the Water Solenoid), from the Solenoid to the Pressure Detector (This does not apply if you purchased a Level 1 Kit), and from the Pressure Detector to the Injector Mount.All of the High Pressure and Fittings are clampless.Because of the unique braid-reinforced design, push-on hose doesn’t require clamps or ferrules to stay put. In fact, the more you pull on the fitting the tighter the hose will grip.When you cut the hose to size, be sure you make a clean, straight cut. When attaching the hose to the fitting, just push it on until the hose is against the yellow piece as shown above.
4.If you have a Dual Stage Kit:
Use the plastic 1/4" Tee to split the tube coming from the water pump into two tubes. These two tubes will then go to the solenoids (one to each).
5.Water Solenoid:
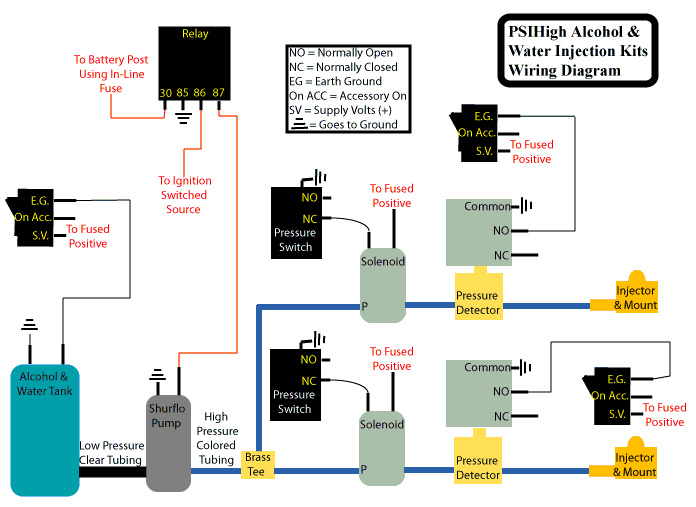
The water solenoid(s) are what turn the water on and off to the injectors.The pump keeps the tubing pressurized all of the time (once pressurized, the pump turns off until the pressure drops).The solenoids react in 50 milliseconds, and allow pressure to be stored in the water lines for immediate release.Single stage kits have one water solenoid and dual stage kits have two solenoids.Wrap Teflon tape (about 3 times) around the brass NPT to barb fittings (seen in picture below), and screw them into the solenoid(s).Try and mount the solenoid(s) as close to the injectors as possible, trying not to go more than 24 inches from the injectors. The new stainless steel and aluminum solenoids do not require a specific direction of the water flow; the valve is strong enough to hold the pressure on either side.
Secure the solenoid(s) with zip ties in a location that is no more than a couple of feet from the injectors.If you wish to secure it more securely, there are four screw holes on the bottom that you can use.The screws can be found at a hardware store.After the solenoids, secure the water tubing as you work your way down to where the injectors will be mounted.Try not to secure any wiring or tubing to an engine component that generates excessive heat.
6.Pressure Detector / Clogged Nozzle Detector:
These are only included in the Level 2 Kits.They should be installed between the water solenoid and the water injector mount.The pressure detector may come preassembled to show you what it will look like.Unscrew the 2 barbs and the detector from the brass Tee, then wrap all threads with around 3 wraps (the two barbs and the pressure switch) with the supplied TFE tape, and then reassemble the pressure detector. These will be connected to a light in the cabin to let you know when the injectors have been pressurized.Mount the supplied light in the cabin in the desired location.
7.Injectors:
The injectors are brass with a removable filter to prevent clogging.They are available in different outputs, all which form an extremely fine mist.Single stage kits will have one injector and dual stage kits will have two. The mount is simply assembled by taking the brass NPT to barb fitting, wrapping it with Teflon tape, and then screwing it into the brass 90° elbow.The injectors are mounted after the turbo, and if you have an intercooler, then after the intercooler.They should be mounted as far from the throttle body as possible to allow the water the most time to distribute evenly.To mount the injectors, drill a 1/8 NPT hole into either the exit pipe of the intercooler, or if you have a metal uppipe, drill it in there.The uppipe is the better location since you can remove it easily to do the drilling.Be sure to drill the hole in a location that you will be able to fit a wrench (or your hand) into to hold the injector when you tighten it.
If you have a 1/8" NPT tap, use it to thread the hole that was drilled.If not, and most people don’t, then that is not a problem.After the hole is drilled, wrap the threads of the injector withTeflon tape, and insert the injector from the inside of the pipe.The supplied Teflon tape is rated at 500° F, so temperature is not an issue.Then, screw the mount onto the injector.Only screw the injector into the mount so there is a water tight seal.Caution: If you screw the injector completely into the mount, the filter will jam inside the mount.Only tighten the injector (wrapped in Teflon tape) as tight as needed for a water tight seal.Washers are provided for spacers to make sure you get an airtight seal.Hand tighten the injector into the mount first and look into the mount so you can get an idea of how much room you have to play with between the screen of the injector and the inside of the 90° brass elbow, then complete the install.
Pressure Switches:
Pressure switches control when the water injection system will activate and begin spraying water.They are available in different pressure ranges, and are all easily adjustable with a 5/64" allen wrench.You can tell what the adjustable pressure range of the pressure switch is by looking at the sequence of numbers printed on the switch.The numbers 904 = 1-4 psi, 905 = 4-15 psi, and 906 = 15-60 psi.Mount the pressure switches in the engine compartment, but away from direct heat sources.Since every car is different, an additional adapter (not included) is needed to splice into the existing vacuum/boost line.The pressure set point is adjustable with the allen screw on the top of the switch, which uses a 5/64" allen key.For single stages, the pressure point should be 50%-75% of your full boost.So if you run 15 psi, set the switch to around 10 psi.If you have a dual stage setup, the low boost pressure switch should be set to about 30% of your full boost, with the high boost pressure switch set to about 75% of your full boost.
Wiring:
There are three basic items that need to be wired:
1-The Water Pump
2-The Pressure Switch(es) to the Water Solenoid(s)
3-The Pressure Detector(s) to lights in the cabin (Level 2 Kits only)
The Water Pump & Relay:
The black wire on the water pump simply mounts to any ground.The red wire is then wired to the relay, to the wire attached to terminal #87 on the relay.Terminal #85 gets wired to any ground.Terminal #30 gets wired to the battery.Make sure to install the inline fuse between the battery + post and terminal #30 on the relay.Terminal #86 needs to be connected to a switched power source that only comes on when the ignition is on.A common place to find a switched wire is at the fuse box.Once wired, use a zip tie to mount the relay out of the way
The Pressure Switch(es) & Water Solenoid(s):
The pressure switch has three terminals on it, a common, normally open, and normally closed.By looking on the side of the switch, you can see the label for which terminal is which.Run a ground wire and connect it to the common terminal (the top one).Next, run a black wire from the normally open terminal and run it to the water solenoid.The normally closed terminal of the pressure switch will not be used.Run the other wire of the water solenoid to positive wire attached to the inline fuse, using the supplied wire splicer.
The Pressure Detector:
These will be connected to the lighted switch, which will be left in the on position, so upon pressure being sensed, the light will illuminate. Just like the plastic pressure switch, the pressure detector has a common, normally open, and normally closed terminal.Use another wire splicer, and run a wire from the positive wire on the protected side of the inline fuse holder (just like you did with the wire from the solenoid.Connect that wire to the common terminal (the top one) on the pressure detector.Then, run a wire from the normally open terminal to the lighted switch mounted in the cockpit.The lighted switch has three terminals, which are Supply Volts, On ACC, and Earth Ground.Connect the wire from the Pressure Detector to the Supply Volts terminal on the lighted switch.Then run a ground wire from the Earth Ground terminal to a ground.The normally closed terminal will not be used on the pressure detector, and the On ACC terminal will not be used on the lighted switch.
[thanks to cominus for updates]