There have been many threads on the glow plug relay bypass idea discussing how and when to turn off the relay, and even whether or not it is a good idea at all. I have come up with a combination of ideas that I feel is the best scenario.
How the glow plugs work depends a lot on the ambient temperature that the computer reads from certain sensors.The computer determines how cold it is outside and sends a signal to the glow plug relay to stay closed for a certain amount of time. The colder it is, the longer the relay stays closed, up to approximately 2 minutes. You can tell when the relay opens by watching the voltmeter after the truck has been started. The needle on the voltmeter will swing to the right indicating less drain on the charging system. The computer also sends a signal to the ‘Wait To Start’ light on the dash. The light is on longer when it is colder outside, about 8 seconds or so, but it is nothing more than an idiot light that should be used as an approximation of the time needed for the glow plugs to warm up.
When the temperature is below, say, 30 degrees, the ‘Wait To Start’ light would stay on for about 8 seconds, but the glow plugs are on for about 2 minutes. It is a good idea to wait even a minute or so after the light comes on to make starting the engine easier. Also remember that every time you start the truck, the glow plugs are active. Essentially you are combining the drain of the glow plugs with the drain of the starter, which ultimately takes it’s toll on the batteries.
When the temperature is warmer, the PSD will start willingly with no waiting for the glow plugs to warm the combustion chamber, so the plugs are on during warmer months when they really aren’t needed. The intention, then, is to decrease the amount of time they are on to extend the life of the glow plugs and relay.
Some feel the glow plugs should be left to cycle on and off as designed to minimize the chance of carbon build-up, which would diminish their effectiveness as well as hinder replacement of the glow plugs. Others say to turn them off completely in the summer when they are really not needed at all to extent their life. What I wanted to do was to combine ideas from posts that I read on the 94-97 forum, and I need to point out that the ideas are not mine and I have tried to identify the authors of the ideas. Nonetheless, my GPR bypass system consists of three parts. 1) The actual disengaging of the GPR after the truck is warm to prolong glow plug life; 2) The actual disengaging of the GPR during starting to prolong the life of the batteries and to ease starting; 3) An indicator light on the dash that shows exactly when the glow plugs are on.
The parts I used are as follows:
- NAPA # TS6709 Coolant Temperature switch.
- NAPA # AR201 Relay (normally closed contacts)
- Spade type weather proof fuse holder and 3 amp fuse, for indicator light.
- Dash indicator light, your choice on color/style/size.
- Approximately 40 feet of 16 gage wire, various colors help.
- Spade, and ring terminals, and heat shrink tubing.
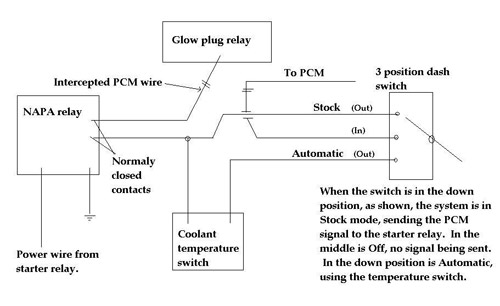
Here is the Electrical Diagram


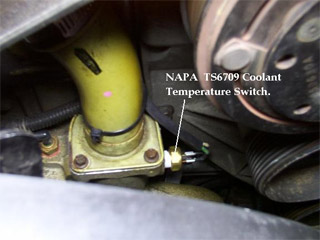
Step 1) Disengaging of the GPR after the truck is warm. This is accomplished by installing a temperature switch in the pipe plug located on the water neck below the thermostat on the front of the engine. This switch is off of a mid 1980s S-10, and is basically what turns the electric fan on when the engine warms up, on those vehicles. The thread type is exactly that of the plug on the water neck. When wired as shown in the diagram, once the engine is up to about 175 degrees, it will cut the signal from the PCM, opening the circuit in the GPR. This way, the glow plugs are guaranteed to cycle at least once a day, every time the truck is first started, and will not come on when the engine is warm, like when you have several stops to make and end up starting your truck several times through the day. This is what killed my first Glow Plug Relay about 2 years after I bought my truck. I was working as a construction supervisor, so I was starting the truck 15 times a day, and eventually the relay gave out.
Installation of the switch isn’t too difficult. Getting to the plug is tight, and make sure you have the new switch nearby, with Teflon tape applied, because when the plug comes off a stream of coolant with impressive force will want to wash down the front of your engine. Unscrew the plug then quickly screw on the new switch. When tightening, pay attention as to the location of the connector prongs. Having them turned as shown in the picture will assist in attaching the spade terminals.

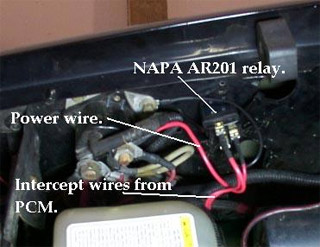
Step 2) Disengaging the GPR while cranking to start the engine, idea credited to The Tank.This is done by using a relay with normally closed contacts. The one I used is the same one that is used on ‘Sparky’s homemade AIC’, only because it was the easiest with normally closed contacts I could come up with. Take a wire from the starter relay on the right fender, from the same terminal as the small wire that goes to the starter telling it to activate, and run it to the new relay as the power source. Connect 2 wires intercepting the PCM signal to the GPR on the 2 other terminals of the relay as shown in the drawing. Now, when you crank the engine, the same wire that tells the starter to turn is opening the contacts in the new relay, thus cutting the signal from the PCM to the GPR. When the truck has started and you stop cranking, then power is terminated and the normally closed contacts connect, continuing the PCM signal to the GPR. This should help extend battery life and assist in starting on those really cold mornings. I wired this to work all the time. If wired according to the diagram, it will cut the signal regardless if the dash switch is left in “Automatic” or “Stock” position.

Step 3) Dash indicator light. I wanted a more accurate way to determine when the glow plugs were actually on than by using the factory Idiot light or by relying on looking at the voltmeter. I installed a light in the blank spot on the dash to the right of the “Wait To Start” light, grounded one side, then ran a wire to the Glow Plug Relay on the terminal leading to the glow plugs. It is important to have a fuse located as close to the relay as possible, because if the wire should short, there would be a lot of current flowing, and the results would sure to be an electrical fire. I installed a ring terminal as close as I could to one side of the spade type fuse holder. Then, use a 3 or 5 amp fuse in the wire to the light, and whenever the glow plugs are active, the light will illuminate.
The indicator light is an ideal test light for a couple of things. It can be used to confirm that the GPR is working properly. It can also be used to know if the engine has cooled down enough that you need to wait for the glow plugs to come on. For example, if you drive over to a buddy’s house to help work on his PSD, and when you go to leave the light comes on, then you know the engine has cooled down to the point to where the temperature switch has closed, sending the PCM signal to the GPR, so you should wait and let the plugs do their job.
Also if you’re working on the glow plug system, you might as well take the time to switch the large wires on the relay. As noted by Kevin Ferguson, by switching the large terminals you can extend the life of the relay because most of the wear comes on the hot side of the relay. By switching the large wires, the hot side will now wear on the other terminal. If your GPR is old, this may not help much. But if it’s a couple years old, you may get a couple more years out of it.
Happy wrenching.

