
About one month after I completed the extraction and re-installation of the PSD from my truck, necessitated to replace a rusted out oil pan, I noticed diesel fuel on the floor of my garage under the rear of my truck. Sure enough the steel rear fuel tank had also rusted through. Why in the world Ford ever put a poly midship tank in, and a STEEL rear tank, I’ll never figure out. So, I contacted Mike at MTS Company, www.mtscompany.com, and ordered a replacement poly rear fuel tank. I figured that since I would have the tank off of the truck, I might as well do the Fuel Tank Vent Mod that has been talked about in the ’94-’97 F-D.com forums. I grabbed the digital camera and went to work.
Overview of Project:
Ford installed a roll-over valve on the top of the fuel tanks that has a small 1/4″ rubber hose that has a vented cap and is clipped to the frame. The roll-over valve’s purpose is to prevent fuel from escaping out of the vent in case the vehicle rolls over. There is also a rubber hose inside of the filler neck that the fuel actually goes through to get into the fuel tank. The steel filler neck and rubber hose you see by crawling under the truck are merely channeling air between them and the internal rubber hose to let air escape from the tank as it is being filled with fuel. This system can definitely be improved upon.
The Fuel Tank Vent Mod uses the roll-over valve attached to a larger diameter fuel line that runs from the fuel tank to a fitting installed on the steel filler neck. This assists in evacuating air from the tank during re-fueling. The fuel cap is designed to vent naturally, so there should not be a pressure problem within the tank. The fuel line connecting the tank to the filler neck will contain any fuel should there be a roll-over situation.(UPDATE: I noticed that the tank becomes very negatively pressurized due to this mod. Continue…)
The modification of the roll-over valve and the steel filler neck is exactly the same on the front and rear, so what I have described below applies to both. Just getting access to the valves is different.
Materials Used:
- Approximately 7 1/2′ of 5/8″ fuel line. I used 3′ for the front vent, and 4 1/2′ for the rear vent. I obtained my fuel line from NAPA, #H-183, for $17 including 4 hose clamps, #705-1313.
- 2 – Brass street elbows with 1/2″ thread, from Homer Depot, Watts AB #A-832, $3.08 each. These are installed in the steel filler neck. You can probably use nylon if you want, but I went with brass for extra strength. (UPDATE: These elbows are not recommended for this mod. Continue…)
- 2 – Brass hose barbs, Watts AB #A-493, $1.77 each, with 5/8″ barb and 1/2″ thread. Each of these is threaded into the brass street elbows. Again, you can use nylon if you want.
- 2 – Nylon hose barb elbow, Watts AB #A-497, $2.08 each, with 5/8″ barb and 1/2″ thread. Each of these gets the threaded end cut off and then installed into the machined factory roll-over valves. These can also be substituted by other fittings, but these are what I used. (UPDATE: One of these fittings should be modified for the rear tank, but you can file the threads off of one hose barb elbow, and that’s all the modification needed for the front tank fitting. I have read that Ford has a roll-over valve for the Cab & Chassis models that will work well for this mod, complete with 5/8″ or 3/4″ barb, not sure which, and pressure vent. But I have no info on that valve. Continue…)
- Fresh pack of JB Weld, $3.97.
Total cost of project is about $35.
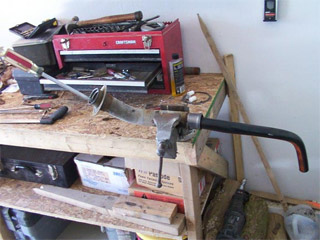
Modifying The Steel Filler Neck:
Unscrew the three 7 mm hex head screws holding the filler neck to the bed, located around the fuel filler cap. Unscrew the two hose clamps where the steel filler neck meets the rubber neck, and gently pull the steel neck out away from the rubber neck. In doing so, you are also removing a long rubber hose that is attached to the inside of the steel filler neck, that goes through the rubber filler tube into the tank. Keep pulling as it’s longer than you’d expect. You will be removing and discarding the rubber hose and internal steel fitting in the following procedure:
With the filler neck out of the truck, clamp it in a vise, carefully, as not to crush it. Use a long screwdriver in the fuel cap end and begin tapping on the ring inside the filler neck that has small crescent shaped holes visible as you look down into the filler neck. Tap with a hammer and pull on the hose sticking out the other end. The object is to get the steel insert part with the crescent shaped holes all the way to the other end of the steel tube.
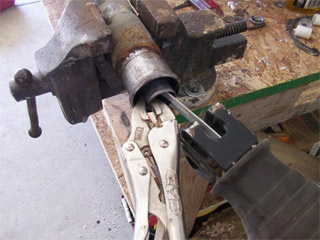
With the steel insert and rubber hose at the bottom end of the filler neck, grab the rubber hose firmly and pull it off of the steel insert. Next, grab the steel insert with vise grips to hold it and use a reciprocating saw to cut a slot in one side of the insert

Using the vise grips and a screwdriver, pry on the insert to try and fold it in on itself and pull it out the end of the filler neck.
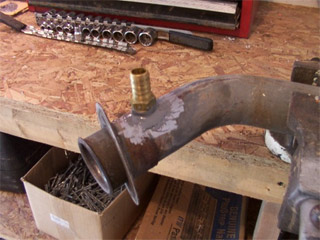
There is a dimple in the side of the steel filler neck just below the mounting plate that works well for locating where to install the hose barb. I used the largest drill bit I had then carefully reamed the hole by hand to get the hole just the right size to thread the 1/2″ brass hose barb into the hole. You only want to go 2 turns or so into the filler neck so that the fitting does not interfere with the fuel filler nozzle when fueling. JB Weld the fitting into place.
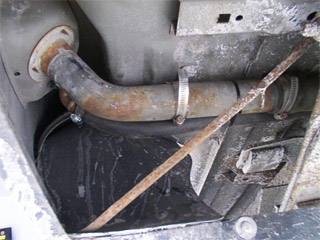
Modifying The Factory Roll-over Valve:
The front valve is really easy to do. Stick your head up under the bed in front of the driver’s side rear tire and look at the top of the tank. You will see where the fuel lines go into the tank and rearward of that is the grossly inadequate roll over valve/vent with a small rubber tube that is clipped to the frame rail. You should be able just to reach in there and wiggle the valve out of the rubber grommet, and unclip the rubber hose from the frame rail. The rear vent will require dropping the tank to get at it. I would recommend removing the tank completely, install the new vent tube onto the tank, then re-install the tank, rather than try to struggle with the tank hanging there. Remove the spare tire, remove 1/2 of the skid/mounting plate, place a jack under the exposed half of the tank, then remove the other plate. It helps to have an assistant, but it’s do-able by yourself with the proper equipment.
I was unable to find a suitable fitting to stick into the factory grommet in the top of the tank, so I modified the factory roll-over valve as follows:
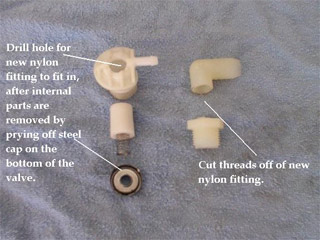
With the roll-over valve removed from the tank, pry the small steel cap off the bottom of the valve and remove the internal parts. Cut the threads off of the new nylon barb-elbow fitting, and drill a hole through the center of the top of the roll-over valve the diameter of the new nylon fitting. I also drilled out the inside of the nylon fitting in the end where the threads used to be, making the I.D. equal to that of the barbed end. Every little bit helps.

For the valve on the front tank, I filed the threads off of one of the 90 degree nylon hose barbs. This decreased the diameter of the fitting, allowing it to be inserted into the grommet in the top of the tank. For the rear tank, the stock 90 degree hose barb is too tall to fit in place, so modification is necessary. I used a Dremel Tool to machine the valve as required to seat the new nylon fitting as low into the valve as possible to avoid clearance problems upon re-installation of the tank. There is also a stock Ford valve from the Cab & Chassis models that can be used for both valves but I have no info on these valves.
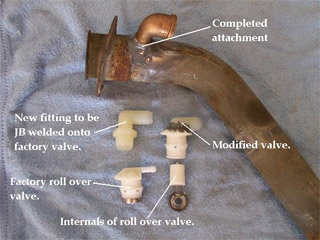
After the roll-over valve has been machined as needed, JB Weld the new nylon fitting into the valve and set it aside to cure. With the cold nights time of year, I brought it into the house and let it cure for a couple days before re-installing it. NOTE: The picture shows the 90 degree brass street elbow. This was eliminated and the brass barb screwed directly into the filler neck.
Installation Of The Parts:
Front tank vent mounted.
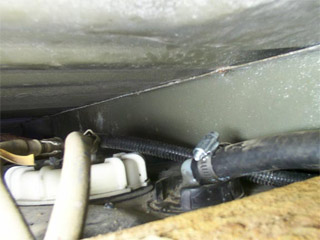
For the front tank, attach one end of the 5/8″ fuel line to the modified nylon barb with a hose clamp. Reach up on top of the tank and insert the barb with the fuel line perpendicular to the frame rail. Re-install the filler neck onto the truck, install the three 7 mm screws before the hose clamps, but after the steel tube is fitted inside the rubber hose.
Front filler neck attached.
Then, run the 5/8″ fuel line up to the barb on the filler neck, cut to length, and install with a hose clamp. I used a zip tie to hold the new hose in place using the hole in the bed support, making sure that the hose slopes FROM the filler neck TO the tank. If you do not do this, the fuel line will create a trap and fuel will sit in the trap and the mod will be worse than when you started. You’re done with the front.
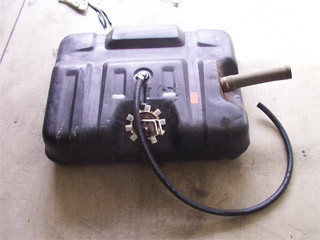
Rear tank assembly.Install the remainder of the 5/8″ fuel line to the modified roll-over valve with a hose clamp, and insert it into the grommet in the fuel tank. Then, re-install the tank, routing the 5/8″ fuel line perpendicular to the frame rail so it comes out by the filler neck.
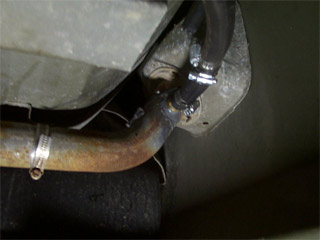
Rear filler neck attached.Re-install the filler neck onto the truck, again start with the three 7mm screws after the steel is fitted into the rubber hose. Cut any excess off of the 5/8″ fuel line, and install onto barb with a hose clamp. Make sure the fuel line runs FROM the filler neck TO the tank, zip tie as needed, and you’re done. NOTE: The picture still shows the use of a street elbow which should NOT be used.
Results:
I was a little peeved after completing the project because there was a leak around the sending unit on the tank, and when I filled it up, I had diesel fuel pouring out the top of the tank. So I needed to pull the tank and re-seal the gasket on the sending unit.
Anyway, I went to the ‘Big Truck’ pump to fill up and was totally NOT impressed. It actually seemed like it took longer to fill up as the nozzle kept clicking off. However, I still have to use the ‘Little Truck’ pump for the real test since the fuel coming out of the ‘Big Truck’ pump just gushes out. All in all, I’d do this mod again as it’s not really that difficult, and didn’t cost that much.
UPDATE: I found out, through other posts on Ford-Diesel.com that you should not use the 90 degree street elbow on the filler neck, only the hose barb. What was happening was the fuel line would dip, creating a trap and collecting fuel and no air at all was getting into the tank. After eliminating the 90 degree street elbows the system works great! I am pleased.
I also took a few minutes to add a relief valve at the filler neck because of the tanks being negatively pressurized. It’s not a big deal really, but with my plastic rear tank, the top of the tank would suck down at least 2″-3″ due to the suction within the tank. I took the 1/4″ hose and cap from the stock roll over valve, and inserted a 1/4″ vacuum line splice in the end of the line, and drilled a hole in the 5/8″ fuel line to accept the other end of the vacuum line splice. It’s held in place with a zip tie. I know that should the truck turn rusty side up that fuel will come out, but it would take a long time for any amount to exit through the 1/4″ line, and I felt something had to be done. I may investigate the other Ford valves that I have mentioned to see if they will serve all the functions I need and I’ll report back later.
Happy wrenching.
