
Bigger injectors require more fuel. Lots more fuel than what the oem system can put out.
And the oem stuff has many faults, which just makes it that much more appealing to replace the whole
darn system! I was planning on doing some work to the truck
and I knew it would be laid up for a while, so figured I might as well go for
it. I knew where I was going with it and a new fuel system was a definite
necessity.
Overview of Project:
I credit just about every
technical detail of this project to Byron Eddins. He created the system, I just
copied it. Even though he offers a very comprehensive kit that would have been
easier to install and probably cheaper in the end, I knew I’d be making some
changes anyway so I figured I’d do it all myself and learn all I can along the
way. I purchased the Vormax filter and the fuel cooler from Byron, and
everything else came from Summit Racing, Jeg’s or locally. I figured up all the
materials myself using the numerous posts on TDS.com and input from Byron
himself, placed a huge order and went to it.
I decided to go all out and
replace every figgin thing in the fuel system. Once I had the bed off and fuel
tanks out (for the sandblasting and painting of the frame) it was easy to rip
out the old lines and install new tubing. I don’t think I would have done it, or
do it again, without removing the bed and tanks. What a pain it would be to do
all this from underneath. Nevertheless, a project like this takes basic
mechanical and fabricating skills, lots of patients, and many trips to get the
necessary supplies and materials.
Materials Used:
Well, I don’t really care to spell out every fitting I used as this was a CUSTOM application.
Your system is sure to be different. But I will touch on the basics:
- Aeromotive A11101 fuel pump.
- Aeromotive 13109 boost controlled fuel regulator.
- Painless #50102 universal fuel pump relay.
- 15′ of #10 Aeromotive AQP socketless hose.
- 10′ of #8 Aeromotive AQP socketless hose.
- 10′ of #6 Aeromotive AQP socketless hose.
- 25′ of Summit 5/8″ aluminum tubing.
- 25′ of Summit 1/2″ aluminum tubing.
- Misc. Aeromotive socketless fittings, and Earl’s tube sleeves, tube nuts, tubing clamps, unions, and
bulkheads. - Summit liquid filled fuel pressure gauge.
- Webb Vormax fuel filter, and fuel cooler from Byron.
Building The Fuel System:
I started by installing a Bronco Fuel Tank
in place of the oem rear tank. I decided to run one larger tank than the
two oem tanks so I wouldn’t have to deal with a cross-over hose between
the two tanks, or build a custom splitter valve. I then
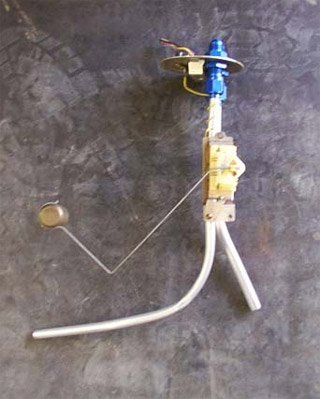
stripped the sending unit/fuel pick-up plate on the top of the tank of
everything but the wire connection. I used a 5/8″ bulkhead fitting
and tubing for the fuel pick-up and a 1/2″ bulkhead fitting and tubing for the return. I kicked
the return to the back of the tank so it wouldn’t be sucking up the warm
fuel just returned from the engine. I attached the oem Bronco sending
unit to the return tube with hose clamps, allowing for fine tuning of
the gauge.
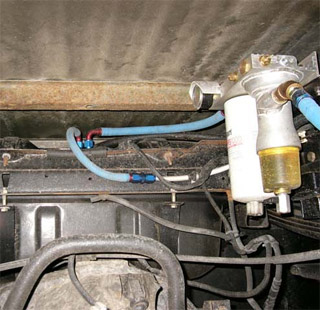
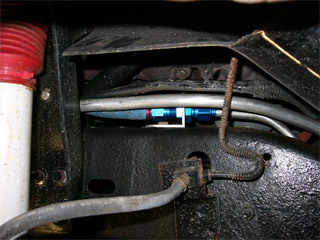
From the pick-up, I ran 5/8″ supply to the Webb Vormax filter, mounted on
a piece of aluminum angle bolted to the top of the frame rail. This is only
possible with the 3″ body lift because the bed will hit otherwise. Also seen
in the pic is the return. I used one piece of 1/2″ aluminum tubing from near
the engine all the way back to the tank, then ran the flexible hose to the
tank.
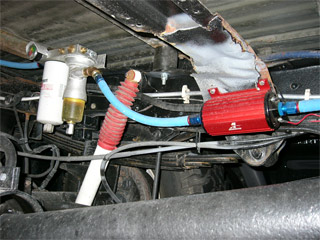
5/8″ hose from the Vormax filter to the Aeromotive pump, then to a
bulkhead fitting on the frame. I ran 5/8″ aluminum tubing from there to near
the radiator. The pump and filter are mounted high, out of harms way and
easy to get to without the front tank there. I did notice a vibration
through the floor of the cab from the fuel pump. I plan to re-mount the pump
using some thick rubber spacers to try to isolate the pump from the frame.
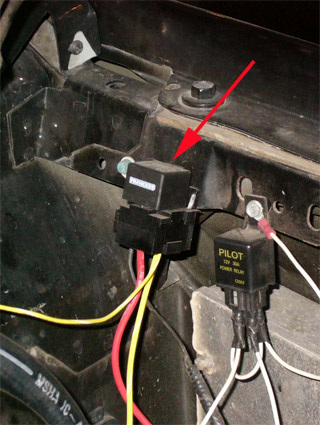
The fuel pump relay. Painless has a great kit, only
takes a few minutes to wire. I installed mine above the IDM on the
driver’s side fender. I wired it to a switch on the dash so I can turn
the pump off when I’m working on the engine and need to crank it over
without fuel being pushed through. Or the switch can be used as a theft
deterant, as the truck won’t run for very long without fuel being pumped
to it.
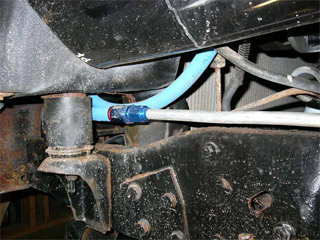
Inside driver’s side front tire. Bulkhead is where
return from regulator transitions to tubing to return back to the tank.
The solid tube is the supply from the pump.
Near the radiator, the tubing from the pump changes
to hose to the cooler, then from the cooler up to the splitter.
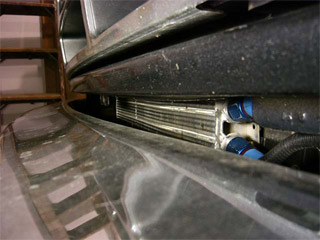
The cooler seen between the bumper and grille. In
thru the bottom, out at the top.
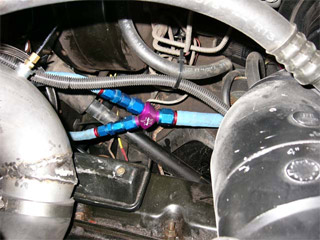
From the cooler to the splitter located on the
driver’s side inner fender. From there, the hose runs to the back of
each head.
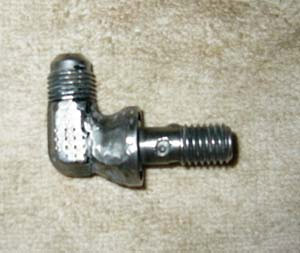
I had to weld a 90* fitting together for the driver’s
side as the body lift prohibited me from using a straight fitting like
what I used for the passenger side. It’s tricky to get the fitting
indexed just right, but a thicker o-ring dialed it in perfectly.
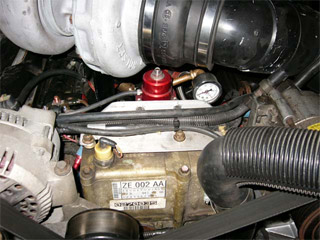
From the front of each head to the regulator. I made
a bracket out of aluminum for the regulator, and added a gauge to ease
adjustments. Boost line comes off the regulator to the left.
Results:
Fuel pressure is great! All the hoses and tubing went together perfectly and are held snuggly away from any
harmful parts. The regulator is real easy to adjust, and all the fittings are
accessible to monitor for leaks, and to tighten if they should appear. Thanks
again to Byron Eddins for creating such a great system.
Happy wrenching.
